
Beauty Spas Articles, Blog, New News and Articles, Home Articles, Hospitality Articles, Weddings Articles
DIY Pressed Flower Wax Paper Lanterns
Mar
Last Updated on 20/07/2015 by Candles Recharge

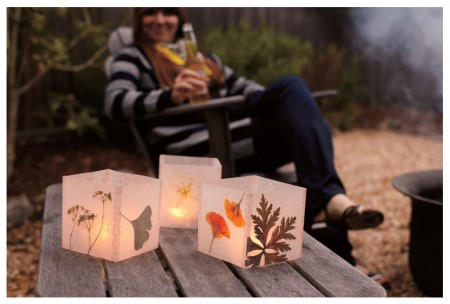
This is a fantastic tutorial for pressed flower wax paper lanterns that I found on A Practical Wedding. If you know how to measure, cut, and iron, you can make these. This gives off such a pretty and delicate look that I am sure that there are many of you other there that will just LOVE this idea! I know that I sure did! These would be great to use in any type of function, wedding, event or birthday party and would also look stunning in a restaurant, bar, hotel or beauty spa.
The most time consuming part is collecting flowers and greenery to press and waiting until they dry nice and flat. Once the lanterns are made, they give off a soft, gauzy light from the fused waxed paper.
Supplies Needed:
- Flowers and greenery
- Heavy book
- Paper towels
- Waxed paper
- Ruler
- Craft knife (like an X-Acto)
- Cutting board or self-healing cutting mat
- Iron
- Ironing board or cloth for pressing
- Washi tape
- Flameless tea light candles
Directions:
Press Flowers and Greenery
1. Collect leaves, flowers and foliage, keeping in mind that delicate, thin leaves and petals will dry faster than thicker specimens. Put flowers, etc. in between two paper towels and place inside a heavy book to dry.
Measure and Cut Waxed Paper
2. Measure and cut four 4 ½ x 9 inch rectangles. You can adjust and make these any size you want, but I’m partial to a nice-sized cube, which makes the math easy. If you adjust, cut the rectangles twice as long as they are high, so they fold into a square.
Make Panels
3. Fold the waxed paper rectangle in half to make a square. Open square, place flower or greenery inside. (photo #2) Close the square so the flower is sandwiched between the two layers of waxed paper.
4. Working on an ironing board or on top of a cloth, pass an iron set to medium quickly over the waxed paper to seal. This will fuse the two layers together. Repeat until you have four finished square panels.
Assemble Lanterns
5. Lay two panels side-by-side with the edges touching. Orient the panels so the side you want to be the front of the lantern faces you (not facing the table). Cut a length of tape about an inch longer than the panel. Center the tape over where the panels meet and press in place.
6. Flip panel over and press the extra tape to the wrong side. “Hinge” panels together and run your finger along the tape to make a sharp crease. Continue joining the panels together until all four panels are taped into a cube.
7. Set your flameless battery operated tea light candle inside the luminaria and enjoy!


