
Beauty Spas Articles, Blog, New News and Articles, Home Articles, Hospitality Articles, Weddings Articles
DIY Candle Holder Tutorial: Faux Birch Candle Lantern
Sep
Last Updated on 25/10/2023 by Candles Recharge
DIY Candle Holder Tutorial: Faux Birch Candle Lantern

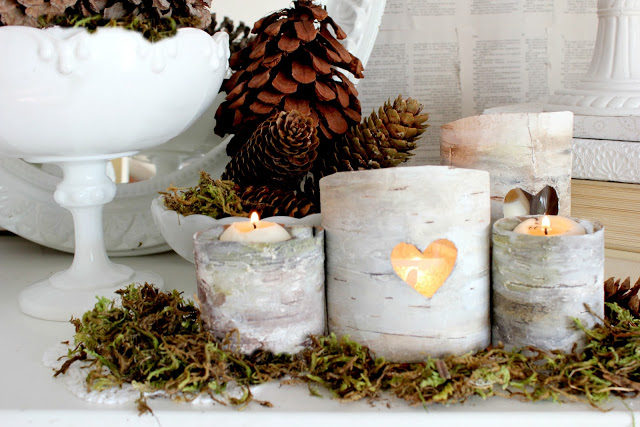
This great idea and tutorial comes courtesy of Lucy at CraftBerryBush, how creative Lucy is that she has seen these holders and then through her own smarts have then created this fantastic tutorial so you can recreate them too!
They are something that is so stylish & can be useful at home, professionally in a restaurant or other business and of course at your wedding! Of course we definitely advocate you using our flameless tea light candles instead of real candles when doing this or any of the projects we share.
Materials Needed:
- Cardboard paper
- Wall compound
- Toothpick or knife
- Scissors
- Stapler
- Brush
- Different size glass jars
- Paint in : White, soft black, dark chocolate, celery green, dried basil green
- Flameless tea light candle
Instructions for forming the faux birch lantern:
- Measure and cut your cardboard to the size of your jar.
- Cut or punch a heart (or other symbol design) or multiple hearts as you like.
- With a putty knife, spread a thick layer of wall compound over the cardboard.
- Make sure you don’t smooth it out, because this is what will give you the ridges and texture.
- With the toothpick, knife (or any sharp edge), make lines and indentations into the compound.
- Form a tube and staple it together PRIOR to the compound drying.
Instructions for painting your faux birch lantern:
Here is where you can get creative and determine what colour combinations you want to mix. There are no set rules because tree bark has various tones and textures. But don’t get too enthusiastic as it’s always easier to add paint than to take it away if you add to much!
- Use a 10:1 white to black paint ratio and sparingly brush onto your tube.
- Brush some brown paint and quickly wipe off with a damp cloth.
- With a brush, dab a mixture of the celery green and dark chocolate paint (4:1 ratio) and again wipe it off with your damp cloth.
- Keep playing with your colours until you are happy with the results. Remember don’t be in a rush, you don’t have to do it all at once you can leave it and then come back to it and add more paint.
- Once you are satisfied then allow the paint to dry and then gently remove the staples from the back of the lantern.
Once you have completed the above then place your flameless tea light candle inside your jar and wrap the ‘bark’ around the jar. With a hot glue gun, glue the ‘bark’ together and then you’re done!


